

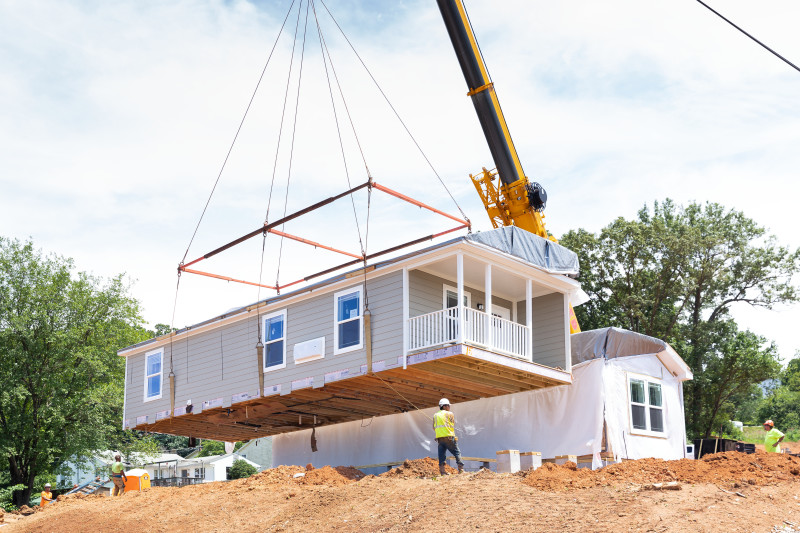
Check out these more detailed steps on how your new multi-section home will be put together on-site.
1. The Marriage Line Gasket The sections of your home will be connected at the marriage line. Extending across the marriage line is a gasket that creates an air barrier between the home sections. The gasket seals the home and helps prevent air leakage to preserve air quality and promote energy efficiency in your new home.
2. Completing Connecting Systems After the marriage line gasket is installed and inspected, the team of professionals working on your home on-site will complete any systems that connect across the home sections such as electrical, plumbing and HVAC systems.
 3. Lining Up the Next Section
Next, the team of installation professionals will position the next section as closely as possible to the section that has already been set on-site. They will line it up so that door frames and connecting systems all match. Depending on the home and your home site location, they may use a crane to place and position the additional section.
3. Lining Up the Next Section
Next, the team of installation professionals will position the next section as closely as possible to the section that has already been set on-site. They will line it up so that door frames and connecting systems all match. Depending on the home and your home site location, they may use a crane to place and position the additional section.
4. Tying Down the Home Once the additional home section has been lined up, installation contractors will then anchor the home to the foundational system. The type of anchoring system may vary based on the type of foundation you have. For instance, if a pier and beam foundation system is being used, the next step will be securing your home with anchors driven into the ground and straps connected to your home’s frame, which helps protect against wind forces.
5. Level the Home The new home section will then be checked for alignment. If needed, adjustments will be made to make sure that floors are flush and level across the sections.
 6. Connecting the Floors
Once the home has been leveled, your floors will be connected with the appropriate fasteners. There are a couple different methods for fastening the floors of the home sections together, so if you want to know exactly how your home is being connected, you can ask your installation team for more details. They may use either toed fasteners, which will be offset across the marriage line, horizontal fasteners through the frame’s rim joists or bolts that go through the frame brackets.
6. Connecting the Floors
Once the home has been leveled, your floors will be connected with the appropriate fasteners. There are a couple different methods for fastening the floors of the home sections together, so if you want to know exactly how your home is being connected, you can ask your installation team for more details. They may use either toed fasteners, which will be offset across the marriage line, horizontal fasteners through the frame’s rim joists or bolts that go through the frame brackets.
7. Connecting the Roofs Just as connecting the flooring can be completed using different methods, so can your roofing. The installation professionals may fasten your roof sections together using toed fasteners through the roof sheathing or by using fasteners through the roof beams inside the home.
8. Connecting the Walls The installation team will begin with the end walls by connecting the end walls with bolts and lag screws. After that, then the interior marriage walls can be connected and the process is complete.
And that’s how a multi-section home is connected! The team of on-site installers and home builders will continue to make final touches to your home, such as completing your roof, connecting all crossover systems such as electrical wiring and water lines, and finishing exterior siding on the ends of your home.
Pretty soon, your Clayton Built® home will be finished and ready for move-in day. Do you want to know more about the on-site home preparation process? Learn how our homes are manufactured step-by-step with Clayton Unbuilt.